Arancini Recipe (Creamy Crispy Fried Risotto Balls)

- Updated
- 32 comments


Bring your favorite Italian restaurant to your own house with this delicious, easy-to-make arancini recipe of stuffed fried risotto balls. These will quickly become your favorite recipe once you try them.
My favorite part of any meal is the delicious appetizers. The assortment of different flavors always makes the experience that much better. If you feel similar, you must try my Chili Garlic Wings or Bruschetta.

Arancini
Arancini are fried risotto balls that are coated in breadcrumbs and fried until golden brown. They are traditionally stuffed with Bolognese sauce and mozzarella, although you can stuff them with whatever you’d like. I personally added peas and fontina cheese to the center of mine.
Arancini was invented in Sicily and is said to date back all the way to the 10th century. While there isn’t any knowledge regarding the exact person who came up with the arancini, the recipe itself seems to have ties to the Arab world since they were the ones who introduced the Sicilians to rice cultivation. Originally it had saffron in it, which you will still sometimes find in certain arancini recipes.
Ingredients and Substitutions
- Risotto – You will need cooked and chilled risotto for this recipe.
- Cheese – I used fontina, which is a softer creamy cheese. Feel free to substitute with Pecorino Romano, Parmigiano Reggiano, or Asiago.
- Peas – Fresh or frozen peas work perfectly.
- Flour – You will need some all-purpose flour for the standard breading procedure. Substitute with bread flour if that is all you have.
- Eggs – Large chilled or room temperature eggs work fine.
- Breadcrumbs – You will need store-bought or homemade breadcrumbs for this recipe. Feel free to use panko if that is all you have.
- Sauce – This is optional, but I served these arancini balls in Pomodoro Sauce. You can also try serving it in a Spaghetti Sauce or Ragu alla Bolognese.
- Oil – Any neutral flavored oil will work for frying the arancini.
How to Make Arancini from Scratch
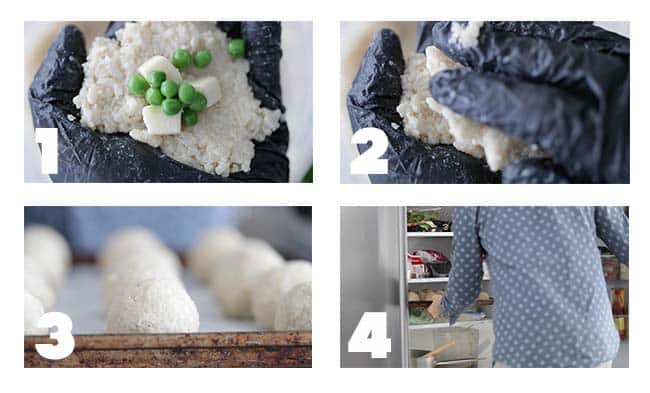
- Place about 3 tablespoons of chilled risotto into your hand and place some fontina cheese and peas in the center. It’s a good idea to get your hands wet ahead of time since risotto is sticky, and this will help release it with ease.
- Take about 2 tablespoons of chilled risotto and place it over top of the fontina and peas.
- Form into a golf ball-sized ball and repeat the process until all of the ingredients have been used.
- Chill in the refrigerator while you set up your standard breading procedures of seasoned flour, seasoned whisked eggs, and seasoned breadcrumbs. It’s important to season each breading procedure.

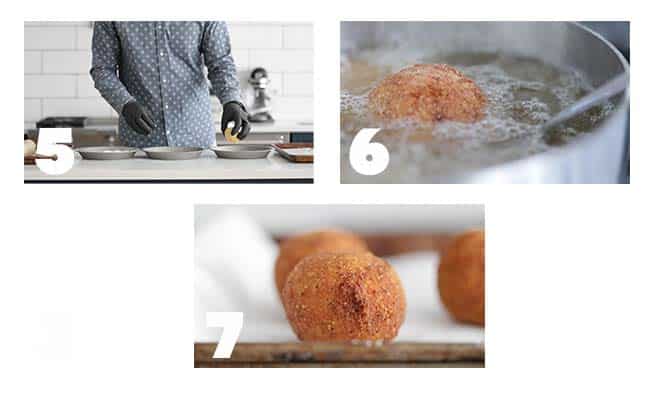
- Dredge an arancini ball in the flour, completely coating it, followed by dredging in the egg wash, coating it, and then finely in the breadcrumbs, completely coating it. Repeat until all of the arancini have been breaded and set aside.
- Add a few arancini balls to some hot canola oil at 350° and cook for 6-7 minutes or until golden brown and the cheese has melted in the center.
- Set the arancini balls onto paper towels to drain before serving.
- Serve the fried arancini balls alongside a meat or meatless tomato sauce.

Make-Ahead and Storage
Make-Ahead: These are meant to be eaten when they’re done cooking. However, you can keep them warm on a rack over a sheet tray in the oven at low temperatures (180° to 200°) for up to 20 minutes. In addition, you can make them and bread them and store them covered in the refrigerator 1 day before frying and serving.
How to Store: Store the arancini chilled and covered in the refrigerator for up to 4 days. They will freeze well and will hold in the freezer covered for up to 2 months. Thaw them in the refrigerator for 1 day before reheating.
How to Reheat: Place them on a sheet tray lined with parchment paper and cover with foil. Bake at 350° for 10 minutes. Remove the foil and bake for 10 more minutes. Serve.

Chef Notes + Tips
- A standard breading procedure consists of a 3-part technique where food is dredged in flour, then coated in egg wash, and then coated in breadcrumbs.
- Try adding sautéed mushrooms to the middle of the arancini along with the peas and fontina cheese.
- Once the arancini are breaded, they can be set on a sheet tray lined with parchment paper for up to 30 minutes before frying.
More Italian Recipes

Video
Homemade Arancini Recipe

Ingredients
- 4 cups pre-made chilled risotto
- 4 ounces fontina cheese cut into small ½” chunks
- ¾ cup thawed peas
- 1 cup all-purpose flour
- 3 whisked large eggs
- 2 cups breadcrumbs
- sea salt and pepper to taste
- 2 cups Pomodoro sauce
- oil for frying
Instructions
- Heat enough oil in a medium-sized pot until it is about ¼ full over medium heat to 350°.
- Take about 3-4 tablespoons of cold risotto in your hand and flatten it out a bit.
- Next, add about 3-4 chunks of cheese and 8-10 peas.
- Take another 2-3 tablespoons of cold risotto, cover the cheese and peas, and then form into a ball using both hands. Repeat until all of the ingredients have been used.
- In a medium-sized shallow wide bowl or cake or pie tin, mix together the flour, salt, and pepper and set aside. In a separate medium-size shallow wide bowl or cake or pie tin, mix together the whisked eggs, salt, and pepper and set aside. In another separate shallow wide bowl or cake or pie tin, mix together the breadcrumbs, salt, and pepper and set aside.
- To bread the arancini, place one of the balls into the seasoned flour and move around until completely coated.
- Next, add it to the seasoned egg mixture and dredge until coated. Lastly, add it to the seasoned breadcrumbs and move around until the arancini ball is completely coated in the breadcrumbs. Set aside and repeat until all the arancini balls have been breaded.
- Place a few of the arancini balls into the hot oil and cook for 6-8 minutes or until golden brown and the cheese has melted in the center. Cook in batches so they don’t clump together, and drain on a paper towel.
- Serve alongside Pomodoro sauce.
I just watched you make these they look so good i have never had them and I am excited so I have printed out everything and am going to make from scratch . yummy I hope
Thanks for giving them a try!
Learned about Arancini from the Italian series Detective Montalbano, a delectable plot element. Not feeling adventurous enough to make them now, but thanks for the recipe inspiration..
I made these last night as an appetizer. Made them golf-ball sized with bacon instead of peas. The game changers for me were making the risotto in a pressure cooker (7 minutes), and then cooking the arancini (for about 15 minutes, sprayed lightly with avocado oil) in my Ninja air fryer instead of frying in oil. Sooooo much easier and less mess on the stove. They came out GREAT! Will definitely be repeating with various fillings in the future.
Thanks for giving the recipe a shot!