
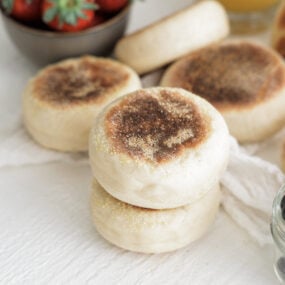
English Muffins
These homemade English muffins are soft and fluffy with plenty of nooks and crannies, made easy with a simple no-knead stovetop method.
Ingredients
- 1 ½ cups whole milk, 110° F
- ¾ cup water, 110° F
- 1 packet active yeast
- 5 cups all-purpose flour
- 2 tablespoons sugar
- 4 tablespoons melted unsalted butter
- 2 teaspoons salt
- oil for coating and cooking
- cornmeal for dusting
Instructions
- In the bowl of a stand mixer, add in the warm milk, water, half the yeast, and 2 cups of flour. Whisk until combined.
- Cover and let stand for 1 to 8 hours to form a sponge. The closer to the 8 hours, the more flavorful it will become. You will see it become bubblier during the process.
- Next, add it to the stand mixer fitted with the hook attachment and mix on low speed for 1 to 2 minutes, until everything starts to move.
- Then, add in the sugar, the remaining yeast, melted butter, salt, and the remaining 3 cups of flour.
- Mix on low speed for 2 to 3 minutes or just until combined. No need to knead the dough for an extended period of time.
- Transfer the dough to a lightly oiled container. Cover with a lid and proof for 2 hours, or until doubled in size. It’ll be even better if you can triple the size.
- Remove the lid and fold the dough from the outside to the inside on all corners.
- Invert the dough on a lightly dusted surface and press down with your hands until it is about ¾” thick.
- Using a 3” to 3 ¼” ring mold, cut the dough into circular rounds. Place them on a sheet tray lined with parchment paper lightly dusted with cornmeal, then flip them over immediately.
- Cover and let them rest for 30 minutes. They should puff up a bit more.
- To cook, brush a thin layer of cooking oil onto a griddle or an extra-large cast-iron skillet over low to medium heat, closer to the medium side.
- Add in as many English muffins as you can without touching each other and cook for 5 minutes per side. They should be browned on each side. While not necessary, feel free to cover them with a lid to help them steam a little more.
- Cool them on a rack and then repeat the process until they’re all cooked.
Notes
As you can probably tell, making English muffins from scratch is a lot simpler than other types of homemade bread. I’ve been making my own bread for years and feel confident using dry yeast here because it develops a deeper flavor in the sponge. Instant yeast will also work if you’re in a rush (you can mix it right into the flour), but you’ll still need to use warm milk and water to get fermentation going. Somewhere between 105°F and 110°F is the sweet spot.
The "fork-split" rule: I never cut into a fresh English muffin with a knife because it compresses all those air pockets. Instead, I poke a fork around the edges and gently pry it open to preserve the texture.
Sticky dough: This recipe uses a high-hydration dough, which means it’s sticky. Just go with it—if it’s dry or too much flour is added, the muffins will be dense instead of puffy.
Handle with care: I’m always gentle when cutting and shaping the dough rounds. Pressing too hard or kneading the dough will pop the bubbles I worked so hard to create during the proofing phase.
Manage the heat: I do my best to keep the griddle on medium heat. Sometimes, I’ll place a lid over the muffins during the last 2 minutes to make sure they’re perfectly cooked in the middle (like a mini oven).
Cook in cast iron: A preheated, lightly greased cast iron skillet works just as well as a griddle here.
Make-Ahead: When I know I won’t have time to cook the muffins, I’ll prepare the dough a day in advance and keep it covered in the fridge. The next day, I’ll take the dough out of the fridge and set it on the kitchen counter for about 30 minutes before shaping and cooking the muffins.
How to Store: I store my leftover English muffins in a covered container on the kitchen counter for up to 3 days. When I want them to last longer, I’ll store them in a ziplock bag in the freezer.
Nutrition
Calories: 249kcalCarbohydrates: 43gProtein: 6gFat: 5gSaturated Fat: 3gPolyunsaturated Fat: 0.4gMonounsaturated Fat: 1gTrans Fat: 0.2gCholesterol: 14mgSodium: 431mgPotassium: 104mgFiber: 1gSugar: 4gVitamin A: 166IUCalcium: 47mgIron: 2mg