
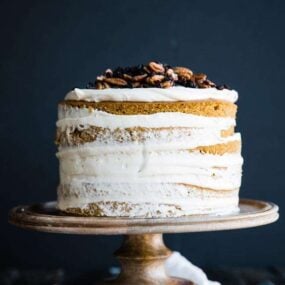
Layered Rum Pumpkin Cake
This Layered Rum Pumpkin Cake is my way of celebrating the season with a dessert full of warm spices and smooth maple cream cheese frosting. I like baking it for Thanksgiving because it makes 16 servings of the ultimate fall dessert that always impresses family and friends.
Ingredients
For the Cake:
- 2 cups of melted unsalted butter
- 10 large eggs
- 2 1/2 cups of loosely packed brown sugar
- 2 cups of sugar
- 3 tablespoons of dark rum
- 2 15- ounce cans of canned pumpkin puree
- 5 cups of all-purpose flour
- 1 tablespoon of baking soda
- 1 tablespoon of baking powder
- pinch of salt
- 1 tablespoon of cinnamon
- ½ teaspoon of nutmeg
For the Frosting:
- 2 pounds of softened cream cheese
- 2 cups of softened unsalted butter
- 4 cups of powdered sugar
- 1 cup of maple syrup
- pecan halves and currants for garnish
Instructions
- Preheat the oven to 350°
- In a standing mixer with the whisk attachment on low speed, mix together the eggs, melted butter, sugars, rum, and pumpkin until combined.
- In a separate large bowl, whisk together the flour, baking soda, baking powder, salt, and seasoning blend.
- Add the bowl with the dry ingredients to the bowl with the eggs and sugar and mix together on low speed.
- Next, evenly distribute the batter onto 3 cookie sheet trays lined with parchment paper and sprayed with non-stick spray, and bake in the oven on 350° for 15-18 minutes. Let completely cool before icing.
- In a standing mixer with the paddle attachment, cream together the cream cheese and softened butter until it becomes light and fluffy. Add in the powdered sugar and syrup, and whip until incorporated and smooth.
- Once the cakes have cooled, use an 8” cake cutter to make 6 layers. Ice in between each layer with the cream cheese frosting and top off with pecans and currants.
- Note: There will be lots of leftover pumpkin cake pieces as well as icing, which is perfect for making trifles in a glass or just mixed together and eaten.
Notes
Letting your ingredients come to room temperature before you start is the key to achieving the perfect texture and balance in this cake. When the butter, cream cheese, and eggs are properly tempered, they emulsify perfectly, giving the batter a velvety texture and helping it bake consistently. It also makes the frosting silky and easy to spread, so each layer looks elegant and tastes exactly how it should.
Thin layers are perfect: I do not worry if the layers look thin because that helps me create several even stackable layers later.
Cool before frosting: I always let the cake cool completely so the frosting spreads smoothly and stays in place.
Mix butter into frosting: When I make cream cheese frosting, I like to mix in some butter too because it softens the tang and adds a silky texture. It is really more of a cream cheese buttercream, but whatever you call it, it tastes absolutely delicious.
Whip until smooth: I make sure the frosting is completely smooth before using it. Letting the butter and cream cheese soften for a couple of hours makes mixing easier and avoids lumps.
Choose your cake size: I like making one tall 6-layer cake, but 2 smaller 3-layer cakes work just as nicely for sharing.
Chill before slicing: I chill the cake before cutting it so the layers stay intact and the slices look clean.
Make-Ahead: I love that this cake can be made in advance, especially when preparing for a busy holiday week. You can bake the layers a day or two ahead, wrap them tightly in plastic, and store them in the refrigerator until you are ready to frost and assemble.
How to Store: I keep this cake covered in plastic wrap and store it in the refrigerator for up to 5 days. It also freezes nicely for up to 2 months if wrapped well in plastic. Since it is a large cake, I usually cut it into quarters so it fits better in the freezer. Before serving, I let it thaw completely in the refrigerator until soft.
Nutrition
Calories: 1200kcalCarbohydrates: 138gProtein: 12gFat: 69gSaturated Fat: 41gCholesterol: 287mgSodium: 448mgPotassium: 400mgFiber: 2gSugar: 103gVitamin A: 7016IUVitamin C: 1mgCalcium: 186mgIron: 3mg