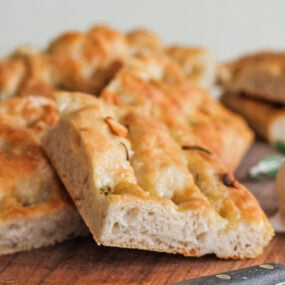

Focaccia Recipe (Focaccia alla Genovese)
Create classic Italian Focaccia alla Genovese at home using a flavorful biga starter for a crisp crust, tender crumb, and amazing flavor.
Ingredients
For the Biga:
- 2 ¼ cups bread flour
- 2/3 cup + 1 teaspoon filtered lukewarm water
- 1/3 teaspoon active dry yeast
For the Dough:
- 2 ¼ cups bread flour
- 1 1/3 cup + 1 teaspoon filtered lukewarm water
- 1 teaspoon active dry yeast
- 2 teaspoons + 1/2 teaspoon coarse salt
- 6 tablespoons olive oil
- Fresh rosemary leaves from 3 sprigs
- 2 thinly sliced garlic cloves
Instructions
For the Biga:
- Add the flour, water, and yeast to a large bowl. Using your hands, gently mix and fold everything together to combine. This should take you about 3 to 4 minutes. Throughout making the biga, the dough will start to become really shaggy.
- Bring the shaggy dough a bit more together to form a loose ball. Then, transfer it to a plastic container with a lid. You can also leave it in the bowl covered with plastic.
- It can sit at a room temperature of 72° or less for 8 to 24 hours. If you are over those temperatures, I recommend letting it sit at room temperature for 4 to 6 hours, then placing it in the fridge for 24 hours, and up to 72 hours.
For the Dough:
- In a separate large bowl, mix the flour and 1 cup of the water until well combined, which takes about 3 to 4 minutes. You can also do this in a stand mixer with the hook attachment on low speed. Let it sit for 30 minutes to autolyse.
- Next, add in all of the biga, the remaining 1 teaspoon of active yeast, 2 teaspoons of coarse salt, and 1/3 cup plus 1 teaspoon lukewarm water.
- Thoroughly mix everything together by squeezing, pincing, and folding the dough over until it is completely combined. The biga should be broken up. This can also be done in the stand mixer.
- Once it is combined, remove it from the bowl and place it on a cutting board or clean surface. Knead using the slap and fold method or continue to stretch and coil the dough. Keep it clean by using a scraper to scrape back the dough if it gets too sticky. This process will take about 10 minutes. The dough should have good elasticity. Again, it can be done in 5 minutes in a stand mixer with the hook attachment on high speed. See my notes about sticky dough.
- Brush a Lloyd pan, half sheet tray, or non-stick 13x9 metal pan with 2 tablespoons of olive oil.
- Transfer the dough to the center of the pan. Cover with a towel and let it proof for 60 to 90 minutes or until it doubles in size. It should spread across the pan, not rise up during this process.
- Next, using your finger tips, press down into and all across the dough while stretching it to each corner. Cover with a towel and let it proof for 60 to 90 minutes or until it doubles in size. It should come to the lip of the pan.
- Preheat the oven to convection 425° F or 450° F, no convection.
- Drizzle the remaining 4 tablespoons of olive oil all over the dough and again press your finger tips down into and all over the dough, creating dimples.
- Season with the remaining ½ teaspoon of salt. Evenly sprinkle on the rosemary and garlic.
- Bake on the middle rack at 425° F convection for 20 minutes. Transfer to a cooling rack and cool to room temperature. Enjoy.
Notes
Does your dough feel sticky and hard to handle? Do not add more flour! Instead, rely on the slap and fold method to develop gluten without losing any moisture. After the ingredients are combined in the bowl, move the dough to a clean surface. Lift it up, slap it lightly against the surface, and fold it over itself. Repeat these steps to build the elasticity and strengthen the dough.
Dough not rising: Expired yeast or kitchen temperatures can affect how your dough rises. Always use fresh yeast that isn’t anywhere near its expiration date. Or, if your kitchen is too cool, move the dough to a slightly warmer spot or a preheated and turned-off oven.
Don’t skimp on the dimples: Use your fingers to press those signature dimples across the entire surface of the dough before baking. This isn’t just for looks—it also creates pockets for olive oil and seasonings to settle into, giving every bite flavor.
Prevent dry focaccia: Two things can dry out focaccia—not enough olive oil and overbaking. Be generous with the oil (both in the pan and drizzled on top), and bake until it’s golden but not deeply browned. Once it’s done, transfer it immediately to a cooling rack to prevent the steam from turning the crust soggy.
Focaccia topping ideas: One of my favorite things about baking focaccia bread from scratch is how easy it is to customize the toppings. If rosemary isn’t your thing, use fresh thyme, sage, or oregano instead. You can also press halved cherry tomatoes, olives, or caramelized onions into the dough, or keep it traditional with just olive oil and salt.
Make-Ahead: The focaccia can be baked up to 1 day ahead of serving. The dough can also be prepared up to the first rise 1 day in advance. Refrigerate it overnight for an even deeper flavor.
How to Store: Wrap the leftover focaccia bread in plastic or foil. Store it at room temperature for 2 days. Store in the freezer for up to 2 months.
Nutrition
Calories: 233kcalCarbohydrates: 34gProtein: 6gFat: 8gSaturated Fat: 1gPolyunsaturated Fat: 1gMonounsaturated Fat: 5gSodium: 391mgPotassium: 52mgFiber: 1gSugar: 0.1gVitamin A: 1IUVitamin C: 0.2mgCalcium: 10mgIron: 0.5mg